A Comparison of Popular Message Queue Protocols
by: Jonathan Minkin and Pat Cody
This post compares the most popular open-source message queue protocols in use.
Message Queues: The Mailboxes of Software Engineering
Consider the postal system- it would be really frustrating if I could only receive mail that was directly handed to me! I would either have to give the postal worker my exact position every day during mail delivery time, or I would have to stay at home to receive letters. To fix this, we have mailboxes, so that postal workers have a known location to deliver mail, and we can check this box whenever we please.
In the world of software engineering, message queues are the digital equivalent to mailboxes; they allow for asynchronous message passing between different applications. Furthermore, they allow for easy distribution of messages, because a client sending messages does not need to know a web address for the other clients, or even how many other clients there are. One common model to achieve this is called the publish/subscribe model, where clients can subscribe to a queue, and other clients can publish data to it. Anything subscribed will be alerted to published data. For a system like this to work, it is important that all clients and servers speak the same “language”, which we call a message queue protocol. This post will analyze three of the major message queue protocols, STOMP, AMQP, and MQTT. We also provide instructions on how to set up your own STOMP system, so that you too can utilize the power of message queues!
What is a Message Queue Protocol?
Let’s first discuss the concept of a message queue protocol. Going back to the postal system analogy, the postal system has a set process for how to send and receive mail. A message is sent by placing the message in an envelope, writing the destination’s name and address, and putting it in a mailbox. The postal service will read the destination, categorize the message as it sees fit, and then eventually deliver the message to its intended recipient. To confirm the delivery of the message, the mail carrier may wait to hand for the recipient to sign for their mail, or they may simply not require delivery confirmation and just put the message in some predetermined place, like a mailbox. You don’t have to be concerned with which mail carrier (like USPS or FedEx) delivers your message or how they organize their messages internally as long as the message gets sent. Your only job is to follow the process of properly addressing your mail and checking your mailbox for incoming mail. This process of how to send and receive mail is the “protocol” of the postal system. Message queue protocols follow the same principles. They do not define how the mail gets organized and delivered, they merely specify how to send and receive messages, and outline the delivery guarantees. It is up to individual implementations of the protocol how messages will be organized and delivered.
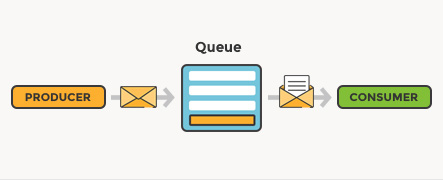
Before digging into the specific protocols, we want to discuss the common architecture between all of these protocols, quickly summarized as the “client-broker-consumer” model. A client, or producer, is any application that would like to send a message to a queue. A consumer is any application that would like to read messages out of a queue. A broker is an application that manages all of the queues. In our postal system analogy, people and businesses are often both producers and consumers, while the broker would be a mail carrier like USPS, FedEX, or UPS.
AMQP
One of the more popular message queue protocols in the finance world is the Advanced Message Queuing Protocol (AMQP). It was created in 2003 by John O’Hara, and represented a change from previous messaging protocols- it was designed to be completely interoperable between applications, so that nothing was vendor-specific. Previously, the only way different systems could connect to each other was via a “message bridge”, which would serve as an interface between the two vendors. AMQP, however, was designed as an open standard that would prevent lock-in and remove the need for these message bridges.
AMQP is an application-layer protocol, and requires interoperability by design, similar to how HTTP, FTP, and SMTP function. This is achieved by being implemented as a binary wire-level protocol. A wire-level protocol describes how communication should occur between two applications, but not how it works under the hood. Wire-level protocols can function either as binary-based or text-based. One of the other significant design decisions of AMQP is the reliability features. Messages that are sent can be guaranteed to be received at most once, at least once, or exactly once, depending on the situational requirements. For example, if a sensor generates often, it might not need the guarantee that a client will receive every single one. On the other hand, if a message is sent every time a new device joins the network, it might be more important that a consumer always receives exactly one message about the event.
When sending messages, there are three fields to fill out. The “Headers” section, which is a set of key-pair values defined by the AMQP standard and is a set of standard settings for the message. The second section is the “Properties” field, which allows for custom key-pair values to enable arbitrary application settings. Finally, there is the “Data” field, where the actual contents of the message can be stored. All sent messages include a header called the “routing key”, which determines how the message will be sent out to the connected consumer queues.
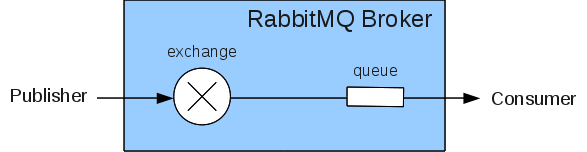
The AMQP architecture relies on creating two systems, the exchange, where messages are sent, and a queue, to hold messages from the exchange. The most basic implementation is a publisher of data (this might be a server, or an IoT device, etc.) will send a message to the exchange, and the exchange will send the message to the queue that a consumer created. The power of AMQP, however, lies in how messages are sent from the exchange to the queue. In a wide-scale system, there will be many consumer queues and many exchanges, and AMQP has a system for deciding what messages are sent from exchanges to queues.
To decide how a queue will receive messages from the exchange, AMQP uses a system called “Message Exchange Types”, which determines the routing behavior for sent messages. Each queue has a “binding key”, which can be thought of as the ID for the messages it will listen for. Meanwhile, each sent message has a routing key, which is similar to the binding key for queues, and the message “exchange type” will determine how much of the binding key has to match the routing key. Binding keys are allowed to have wild cards, so queues can receive messages for multiple topics. A “#” will match 0 or more dot-delimited words, while a “*” will match exactly one. If a message is sent with a “Direct” exchange type, it will only go to queues that have an exact match between the routing and binding keys, and will ignore wildcards. If the message is sent with the “Topic” exchange type, the wildcard rules will be obeyed. If a message is sent with the “Fanout” exchange type, messages will be sent to any and all connected queues from the exchange.
To illustrate this idea, let’s imagine that GW publishes news alerts by sending out AMQP messages. If we create a queue with the binding key of “GW.SEAS.#”, what messages would we receive? A message with a routing key of “GW.ELLIOT.IA” would not work, as the wildcard only comes after the “SEAS” part of the key. However, both “GW.SEAS.CS” and “GW.SEAS.MAE” would go to our queue, becaue of the wildcard. What if our binding key was actually “GW.SEAS.*”? A message with a routing key of “GW.SEAS.CS” would work, but “GW.SEAS.CS.WOOD” would not.
STOMP
Not long after AMQP was introduced, the first version of the Simple (or Streaming) Text Oriented Message Protocol (STOMP) was released. STOMP was created due to the need to connect to enterprise message brokers from scripting languages like Ruby, Perl, and Python. Scripts in these languages generally do simple tasks, like “send a single message and then disconnect” or “consume all messages in this queue, and then disconnect”. It is thus helpful to have a simple, easy to understand protocol where a script could send a command to do a simple task, and then disconnect.
Like AMQP, STOMP is also an application-layer protocol. However, it differs from AMQP in that it is implemented as a text wire-level protocol rather than a binary wire-level protocol. This means that messages to the broker can be written as text and sent as is over a transport protocol. Communication with brokers is done using “frames”, which are similar to messages in AMQP. Each frame contains a command, a set of headers, and an optional frame body depending on the command. There are only ten commands that a consumer/producer can send to the broker, and the broker can only respond with four types of frames. Most frame types will have a set of required, recommended, and optional headers. For example, a SEND frame must have a “destination” header. The frame types are listed below:
-
Client Frames:
- CONNECT/STOMP (as of version 1.2, both do the same thing)
- SEND
- SUBSCRIBE
- UNSUBSCRIBE
- BEGIN
- COMMIT
- ABORT
- ACK
- NACK
- DISCONNECT
-
Server Frames
- CONNECTED
- MESSAGE
- RECEIPT
- ERROR
Also of note is the fact that STOMP has no concept of queues or exchanges, but rather simply “destinations”. A destination is an opaque string, and STOMP allows for different broker implementations to specify a naming convention for destinations that can determine the delivery behavior. STOMP provides that producers can send messages to a destination, and consumers can subscribe to a destination to receive messages at that destination as MESSAGE frames.
As the name implies, the goal of STOMP is simplicity. While STOMP may be less feature-rich than AMQP, and may be verbose in terms of bytes on the wire, creating clients to interact with the broker is incredibly easy. It is possible to interact with a STOMP broker using only telnet, and the STOMP website brags that developers have been able to make STOMP clients in a matter of hours. This makes STOMP useful for scripting, as the only requirement for a client is the ability to send and receive text using a transport protocol like TCP.
MQTT
While AMQP is designed to be a highly reliable protocol, it was not optimized for resource or network constrained conditions. The Message Queue Telemetry Transport (MQTT) protocol, on the other hand, was originally created in 1999 as a communication protocol for monitoring an oil pipeline. It is designed to be bandwidth-efficient and lightweight, making it a good choice for low-power IoT devices.
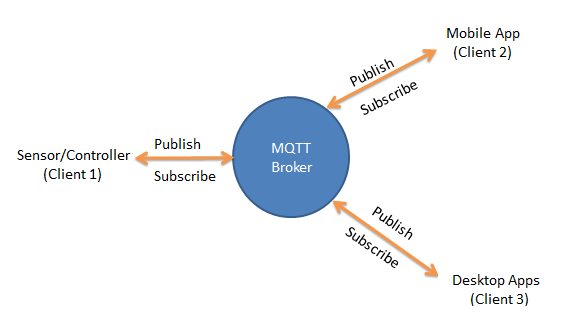
The MQTT architecture is less complicated than the AMQP architecture, and contrary to its name, does not actually require a queue. Clients send messages to the middleman broker using a particular topic, which is similar to an email subject field, or the routing and binding key system from AMQP. Any clients connected to the broker that are subscribed to the same topic will receive any messages published to the topic. This allows a large number of IoT devices to publish to a centralized location, and cloud servers only need to connect to a single device, rather than each individual sensor.
The above picture represents the MQTT architecture. All of the clients connect to a centralized broker, and each can publish to a topic or subscribe to a topic. All devices in the MQTT system connect to the broker, from the IoT sensors to the cloud computing servers.
Demo of the Protocols in Action
To demonstrate one of these protocols in action, we’re going to use telnet to build a simple producer and consumer that use the STOMP protocol. Using telnet, we’ll write the STOMP frames manually and send them to the broker to show what happens under the hood of a STOMP library.
Setup
For this demo, we will be using RabbitMQ and telnet. RabbitMQ is a message queue broker with support for all of the protocols we have discussed. For the sake of convenience, we recommend using the Docker image that RabbitMQ provides for testing, but you can install RabbitMQ natively on your system if you so choose.
Telnet is included by default in most Linux installations. For Windows and Mac, you may need to install telnet manually. See instructions for Windows and Mac. Note that this demo assumes a Unix environment (Linux or Mac) so key bindings may be different on Windows.
To install Docker, follow the instructions here for your specific platform. Note that if you are on Linux, your distribution’s package manager may already have a Docker package.
Once you have installed Docker, run the following commands to create and start a RabbitMQ container:
docker create -it --name rabbitmq -p 5672:5672 -p 15672:15672 -p 61613:61613 rabbitmq:3-management
docker start rabbitmq
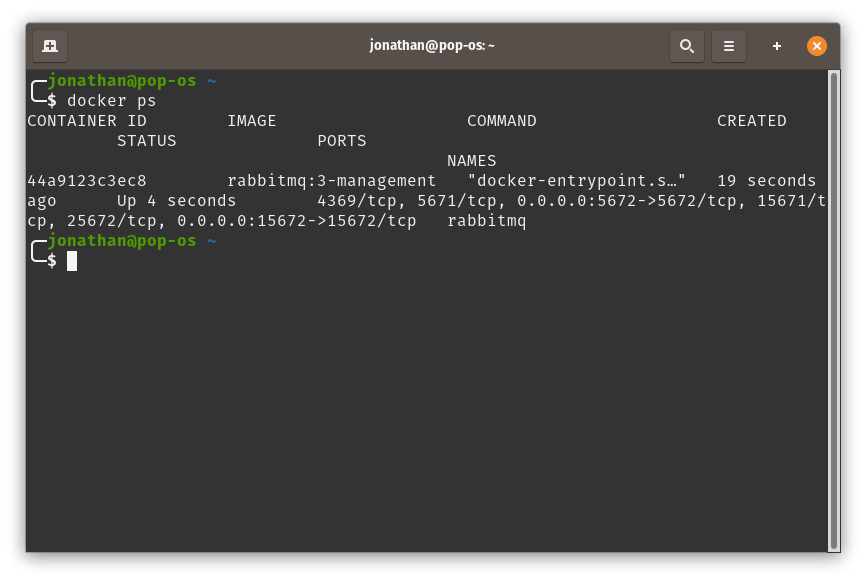
You can verify that the container is running by typing: docker ps and you should see something like this:
Now that we have RabbitMQ running, we need to enable the STOMP protocol to allow RabbitMQ to respond to STOMP commands. First open up bash within the container by running:
docker exec -ti rabbitmq bash
Your terminal should now start with “root” to indicate that you are inside the Docker container, like so:
Now run the following command to enable the STOMP plugin:
rabbitmq-plugins enable rabbitmq_stomp
You can now exit the container by simply typing exit
Demo
Now that we have all the software set up, let’s connect to the message queue broker. To start, open two terminals, and in both of them run:
telnet localhost 61613
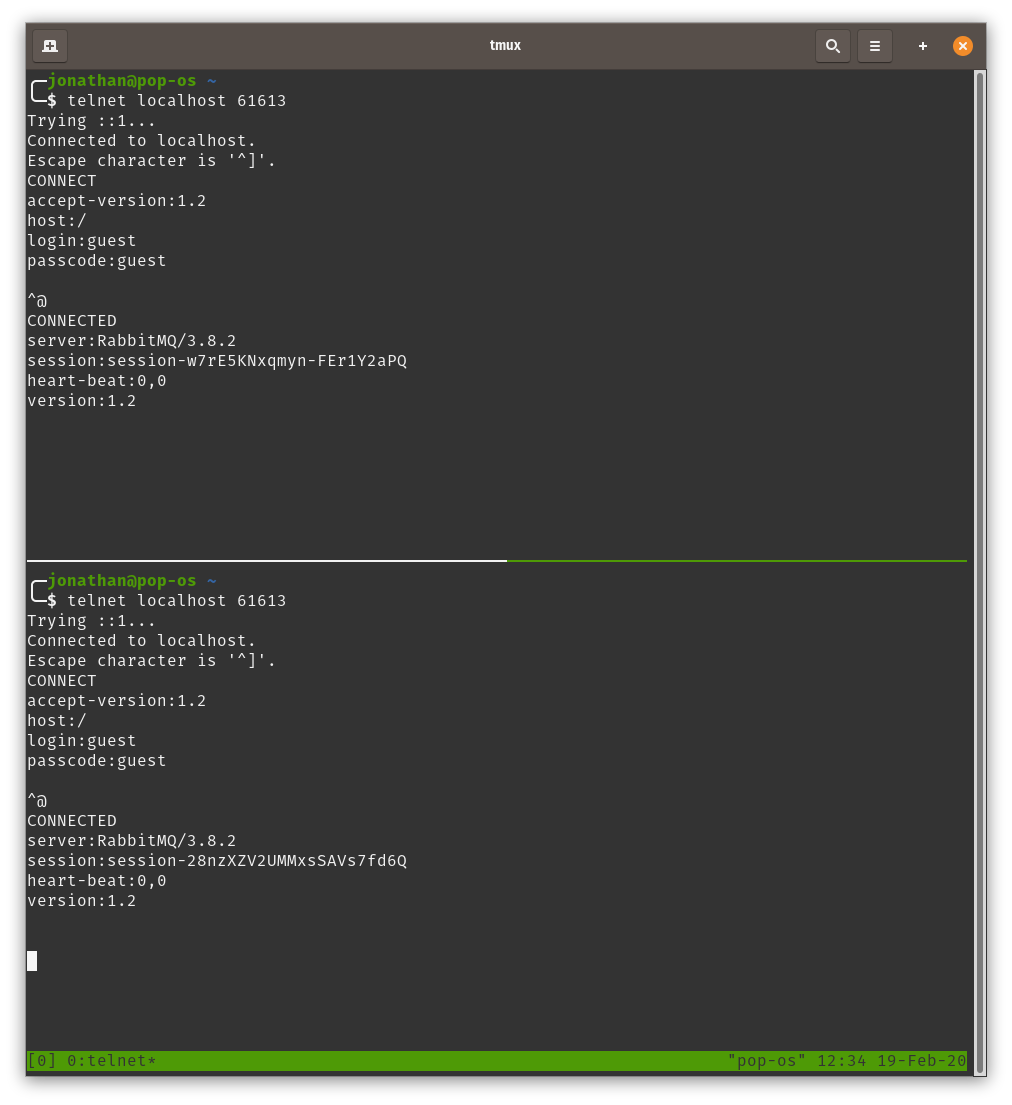
One terminal will act as your “producer” while the other terminal will act as your “consumer”. Both the producer and the consumer must first connect to the broker by sending a CONNECT frame. A CONNECT frame has the headers “accept-version” to specify the version of STOMP, “host” to specify the hostname of the broker, and “login” and “passcode” to log into the broker. For RabbitMQ, the accept-version is 1.2, the host is optional, but can be specified as “/”, and the login and passcode are both “guest”. As a result, the connect frame will look like this:
CONNECT
accept-version:1.2
host:/
login:guest
passcode:guest

^@
Note that we specify ^@ at the end of the message. This represents the “null” character in Linux, and is used to close every STOMP message. To form this character in Linux, do not copy and paste it from this guide, but instead type “Ctrl+@” (remember to use shift).
Copy this frame into both telnet terminals to connect both the producer and consumer to the broker. Assuming the connection was successful, you should receive a response from the broker that looks something like this:
Now that both your producer and consumer are connected to the broker, let’s send some messages to the queue. Sending a message is done using a SEND frame. The SEND frame requires the “destination” header, but does not specify what the destination should be called. For RabbitMQ, destinations follow the form “/queue/<queuename>”. It is also recommended that a SEND frame have a “content-type” header, describing the content type of the bytes in the body. Additionally, can optionally include a “receipt” header with a random number as a value. Providing this header requires the broker to respond with a RECEIPT frame acknowledging that it has received the message. As a result, a frame to send a message will look something like this:
SEND
destination:/queue/foo
content-type:text/plain
receipt:123

This is the body of my message ^@
To start, create two SEND frames in this format with different messages and send them in the producer window of your terminal. The server should respond to both frames with a RECEIPT frame with the number you provided.
Now let’s register the consumer to consume messages from this queue. To consume from a queue, the consumer has to send a SUBSCRIBE frame to the broker describing how it wants to consume from the queue. A SUBSCRIBE frame requires an “id” header with a unique number to identify that subscription to the broker. Also required is the “destination” header, which is the destination to receive messages from. Lastly, the “ack” header is strongly recommended. The “ack” header describes whether or not the consumer must respond with an ACK frame to acknowledge to the broker that it has consumed a message. The valid values are as follows:
- “auto”: the default value, if not given. If set to auto, the consumer does not have to acknowledge to the broker that it has consumed a message
- “client”: if set to client, the broker requires that the consumer send either an ACK or a NACK frame back to the broker to acknowledge that it has properly consumed a message. The ACK is cumulative, which means that sending an ACK will acknowledge every message that has been received so far.
- “client-individual”: if set to client-individual, the required behavior is similar to client, with the exception that the ACK frame is not cumulative. This means that the consumer must send an ACK for every message it receives.
If set to “client” or “client-individual”, every message will have an “ack” header, with a random number that the consumer must send in the header of its ACK response.
We will set our consumer to use “auto” for the purpose of this demo. Our SUBSCRIBE frame will look like this:
SUBSCRIBE
id:0
destination:/queue/foo
ack:auto

^@
Upon sending the subscription to the broker, the broker should immediately deliver MESSAGE frames with the first two messages that your producer sent. The messages will be consumed in the order they were sent. Your output will look something like this.

If we send another message to this queue in the producer, we will see the message appear in the consumer soon afterwards.
Lastly, we will gracefully disconnect both the producer and consumer from the broker. To do this, we send a DISCONNECT frame to the broker. The DISCONNECT frame requires a “receipt” header with a random number that the broker must respond with. The broker will ensure that all pending frames incoming or outgoing are sent, and will then respond with a RECEIPT frame and then close the connection. The DISCONNECT frame will look like this:
DISCONNECT
receipt:456

^@
You can now shut down and remove the RabbitMQ Docker container using the following commands:
docker stop rabbitmq
docker rm rabbitmq
Sources
- https://spring.io/blog/2010/06/14/understanding-amqp-the-protocol-used-by-rabbitmq/
- https://www.concurrency.com/blog/june-2019/introduction-to-mqtt-protocol-for-iot-applications
- https://www.cloudamqp.com/blog/2014-12-03-what-is-message-queuing.html
- https://blogs.vmware.com/vfabric/2013/02/choosing-your-messaging-protocol-amqp-mqtt-or-stomp.html
- https://en.wikipedia.org/wiki/Wire_protocol
- https://en.wikipedia.org/wiki/Message_queue#Standards_and_protocols
- https://en.wikipedia.org/wiki/MQTT
- https://en.wikipedia.org/wiki/Advanced_Message_Queuing_Protocol
- https://en.wikipedia.org/wiki/Streaming_Text_Oriented_Messaging_Protocol
- https://stomp.github.io/
- https://www.rabbitmq.com/stomp.html